UX Certification
Get hands-on practice in all the key areas of UX and prepare for the BCS Foundation Certificate.

Morae makes it easy to log usability tests, create video highlights and allow observers to view a test in progress. But Morae is designed to support usability tests of software, not paper prototypes. This how-to article shows you how to exploit the full functionality of Morae when carrying out a paper prototype test.
Note added Sept 9 2008: This walkthrough applies to version 2 of Morae. Morae 3 supports paper prototyping out of the box.
Before we start, we should address an important issue. What benefit is there is using Morae for paper prototyping?
Having carried out scores of paper prototyping sessions, I'm acutely aware of practical problems with the methodology. First, it's impossible to record and log usability issues during a paper prototyping session if you have just one person running the test. You need one person to "play the computer" and move the interfaces pieces around and a second, the observer, to record the usability issues. This has an immediate impact on resourcing the test as it means you need two usability experts to run the test on site.
Even when you have the luxury of two usability experts, there's no ideal place to position the observer. Some people place the observer in the same room, but this can unsettle the participant, as the observer may need to crane his or her neck over the prototype to read the interface elements and accurately record what the participant is doing. Some people use closed-circuit video so the observer can watch from another room but there's still a lot of pressure on the observer to take accurate real-time notes because no-one wants to have to review the video tapes. A closed-circuit TV solution also requires a two-room usability lab of course.
A third problem is communicating the results to the development team. Highlights videos are one of the most convincing ways to do this, but editing traditional, analogue video is a very lengthy process.
We can use Morae to solve these problems. We simply set up the computer so that it can record from two video sources: a camcorder (which will record the prototype and the participant's hand movements) and a webcam (which will record a 'head and shoulders' shot of the participant).
Let's show how this works in practice.
This step is particularly fun for those of us who miss the video gadgets that we used to be able to play with before the days of Morae. As well as the USB webcam that you probably already use with Morae, you'll also need a digital camcorder with a Firewire (IEEE 1394) port. The computer running Morae Recorder also needs a Firewire port so the camera can be connected to it.
First, connect your camcorder to your computer and start a video editing program. We used DVGate Plus, simply because it came for free with our Sony laptop. You then need to set up this program to import video, but you won't be reading from the tape: you'll simply be using your computer screen to watch your camcorder's output. If you now turn on your camcorder, you should see the camcorder image appear in the video window of your video editing program. All we're using this program for is to monitor the camcorder image. So make this window as large as possible; in DVGate Plus we found a "full screen" option, which was ideal.
Next, set up the camcorder so that the prototype is properly framed in the camera. You can do this with a large tripod positioned above the prototype but it will be even better if you can fix the camera to the ceiling. You may need to play with the zoom controls to optimise the way you frame the image.
The next part of the video configuration is to connect your webcam to the computer so you can record the participant. Launch Recorder and position the webcam so that you can get a nice head and shoulders view of the participant. Note that the participant doesn't need to be sitting in front of the computer to do this (see our pictures of the set up below). Then choose "Machine Settings..." from Observer's "Record" menu and choose the "Full motion video" option from the "Screen Video" tab (see Figure 1). This changes the codec that Recorder uses from the default so that you get more reasonable file sizes for this activity.
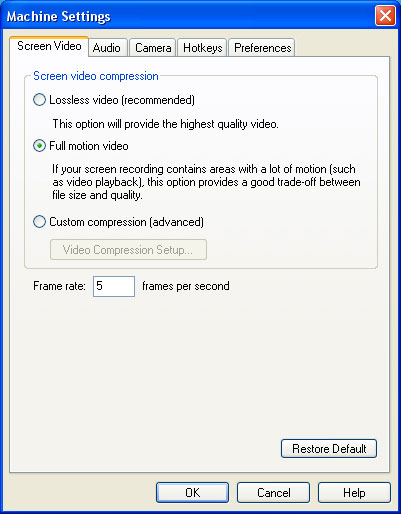
Figure 1: The screen video tab of Morae's Machine Settings dialog box.
So let's summarise the results of this step. You should have two applications running: a video editing program that you're using to monitor the output of the camcorder. And Morae Recorder that you've set up in the normal way to record the screen and the webcam. Now we're ready to run the session.
Start recording with Morae and then switch to the application you're using to monitor the output of the camcorder. The computer screen should now be showing a live image of the paper prototype. Make this window as large as possible. Then run the paper prototyping session as normal.
Because we're recording the test session, we can carry out the paper prototyping without an observer as the moderator can later review the recordings in Morae. Alternatively, a datalogger can connect to the session remotely, view the paper prototyping session in real time and create markers as he or she sees fit.
Figures 2 and 3 show how the setup looks in practice. In these photographs, the participant is on the left and the moderator is on the right (in this set up, the moderator is also playing the computer). You'll see that we're running Recorder on a laptop and we've simply reversed the direction of the webcam so that it looks behind the computer rather than in front. In this set up, the camcorder is fixed to the ceiling and pointing down to the prototype. You can see the camcorder output on the computer screen in Figure 3. You'll also see that we present the prototype on a piece of black board; this helps the participant keep the prototype pieces within camera shot and discourages the participant from spreading the pieces out on the table.
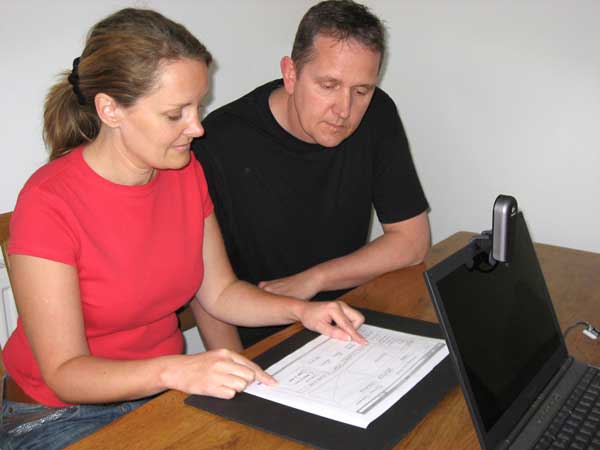
Figure 2: Usability test participant uses a paper prototype watched by a usability test administrator.
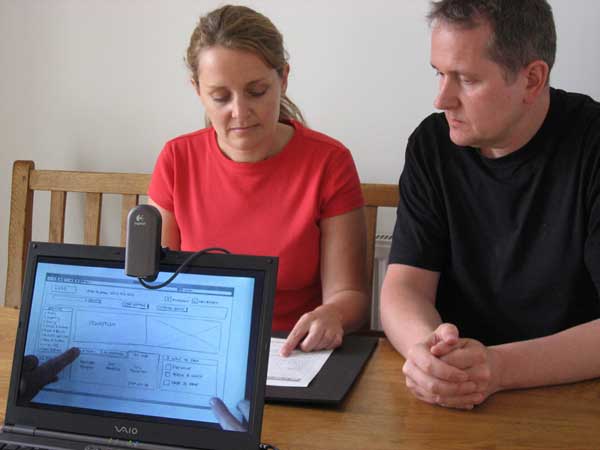
Figure 3: View of participant, moderator and computer screen in a Morae-enhanced paper prototyping test.
Finally, we import the recording into Morae (see Figure 4) where we can log usability issues, review any markers added by remote viewers and create a highlights video.
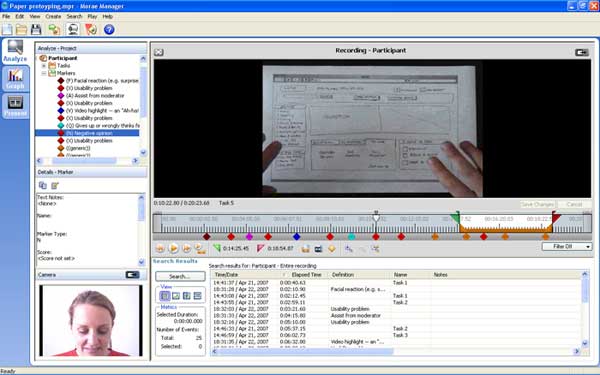
Figure 4: Morae Manager showing user interface, participant video and logging data.
In our experience, this set up works best if you have a dedicated room you can use for usability testing, as the camera can be fixed to the ceiling. But you could also connect the camcorder to a tripod and use this methodology to test paper prototypes in the user's home or place of work.
We don't recommend this solution for every paper prototyping test, but if you need a set-up that allows observers to view your test or if you want to create a highlights video of the sessions, then Morae is an ideal solution.

Dr. David Travis (@userfocus) has been carrying out ethnographic field research and running product usability tests since 1989. He has published three books on user experience including Think Like a UX Researcher. If you like his articles, you might enjoy his free online user experience course.

Gain hands-on practice in all the key areas of UX while you prepare for the BCS Foundation Certificate in User Experience. More details

Every usability professional knows that Morae is a useful tool for running a software or web usability test. But did you know you could also use it to dramatically speed up the time it takes to do a heuristic evaluation? Heuristic Evaluation with Morae.

Targeted at both new and experienced users of Morae, "Morae for Usability Practitioners" is a step-by-step guide to using Morae to plan, execute and analyse usability tests. Packed with insider tips and expert advice, this guide will help you use Morae to its full potential. Morae eBook.
This article is tagged usability testing, prototyping, ia, morae.
Our most recent videos
Our most recent articles
Let us help you create great customer experiences.
We run regular training courses in usability and UX.
Join our community of UX professionals who get their user experience training from Userfocus. See our curriculum.
copyright © Userfocus 2021.
Dr. David Travis (@userfocus) has been carrying out ethnographic field research and running product usability tests since 1989. He has published three books on user experience including Think Like a UX Researcher.
Get hands-on practice in all the key areas of UX and prepare for the BCS Foundation Certificate.
We can tailor our user research and design courses to address the specific issues facing your development team.
Users don't always know what they want and their opinions can be unreliable — so we help you get behind your users' behaviour.